6. Connector Functions
⚡ The Superpower of Connector Functions
What if your devices don’t follow the OpenGate standard message schema?… Use Connector Functions. Connector Functions are one of OpenGate’s most powerful features. They allow you to transform, enrich, and adapt incoming data so it can be properly collected and processed by the platform.
Whether your devices send custom payloads, use different field names, or require preprocessing, Connector Functions give you the flexibility to make it work.
🧪 Connector Function Example
Let’s walk through a practical example. We’ll create a Connector Function to receive a JSON payload using the OpenGate Standard HTTP connector and adjust it to collect the values correctly.
🔧 Step 1: Create the Connector Function
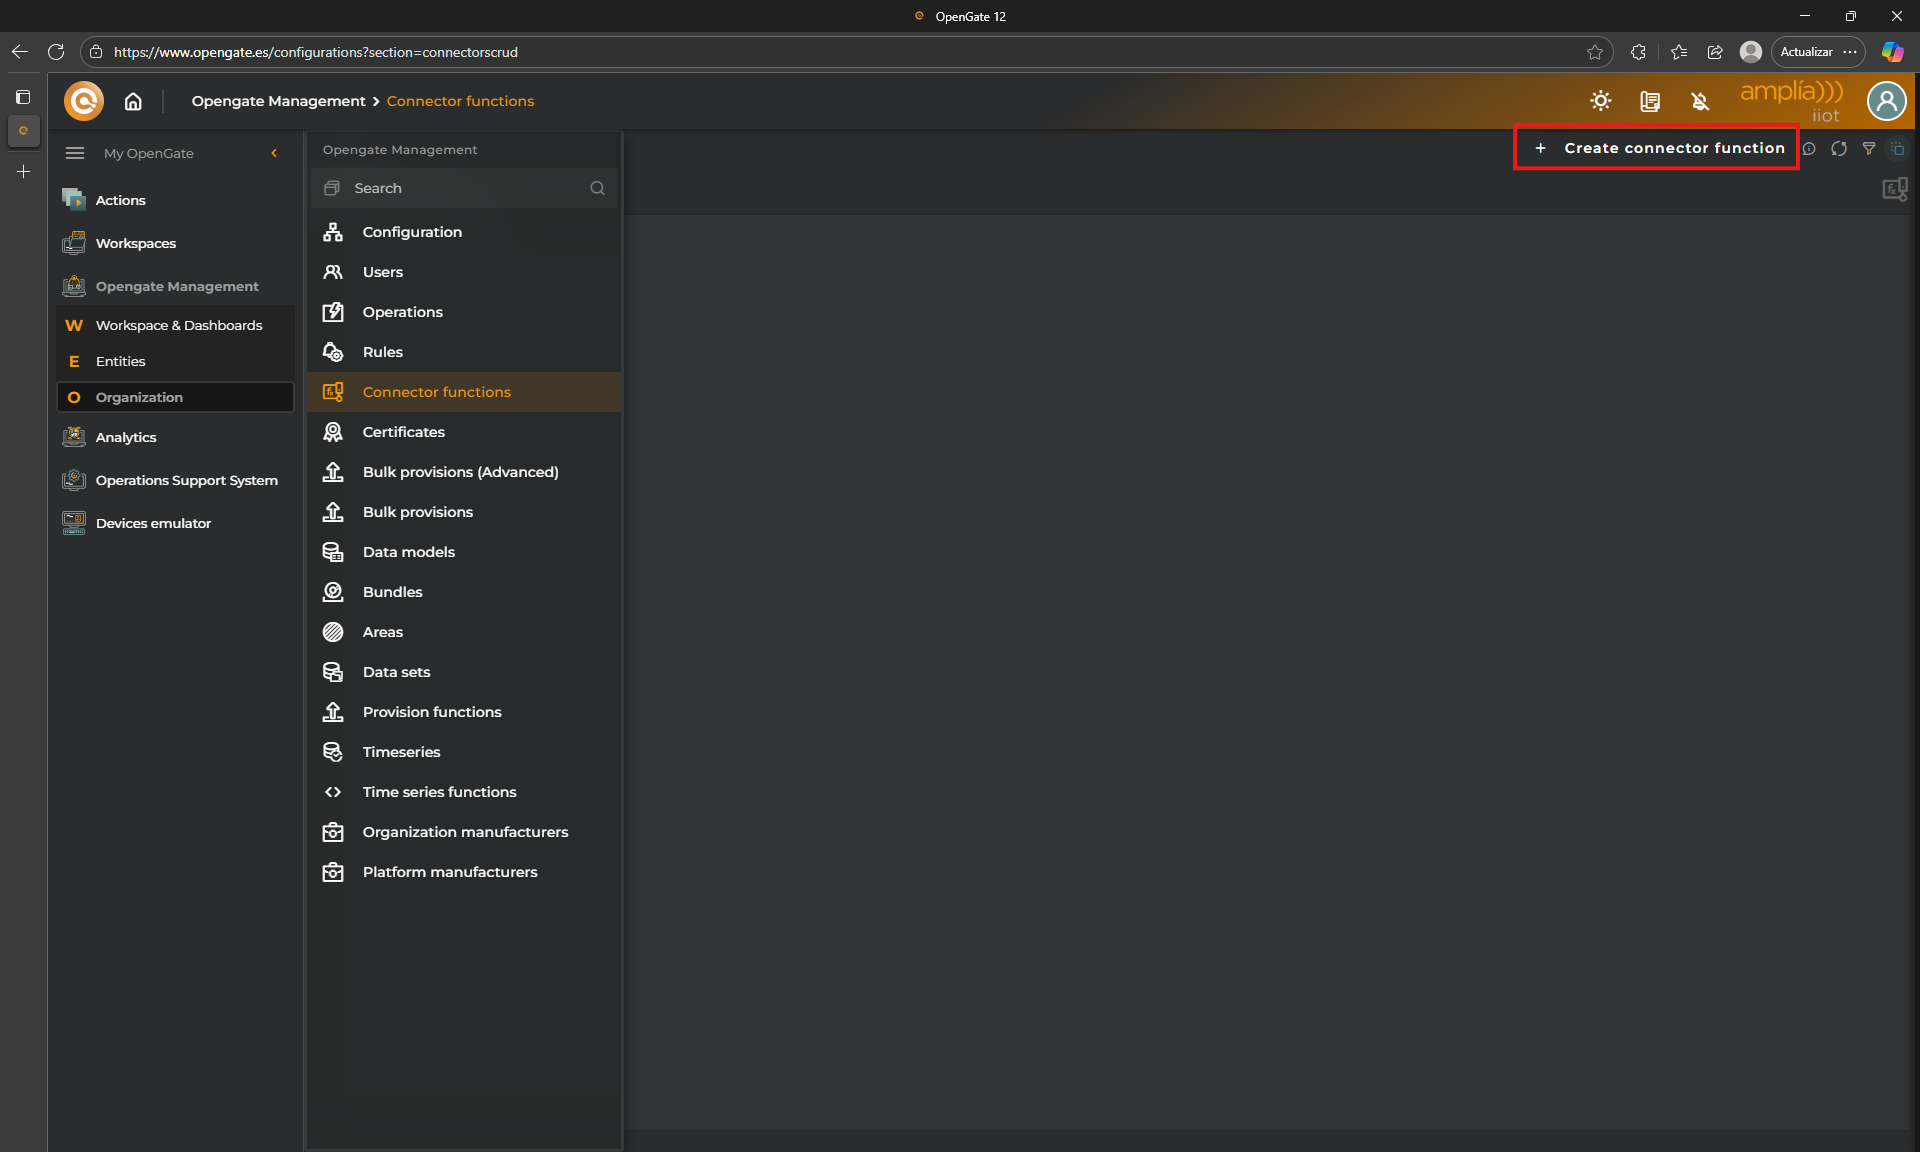
1. Open the wizard
Go to OpenGate Management > Connector Functions and click on New Connector Function.
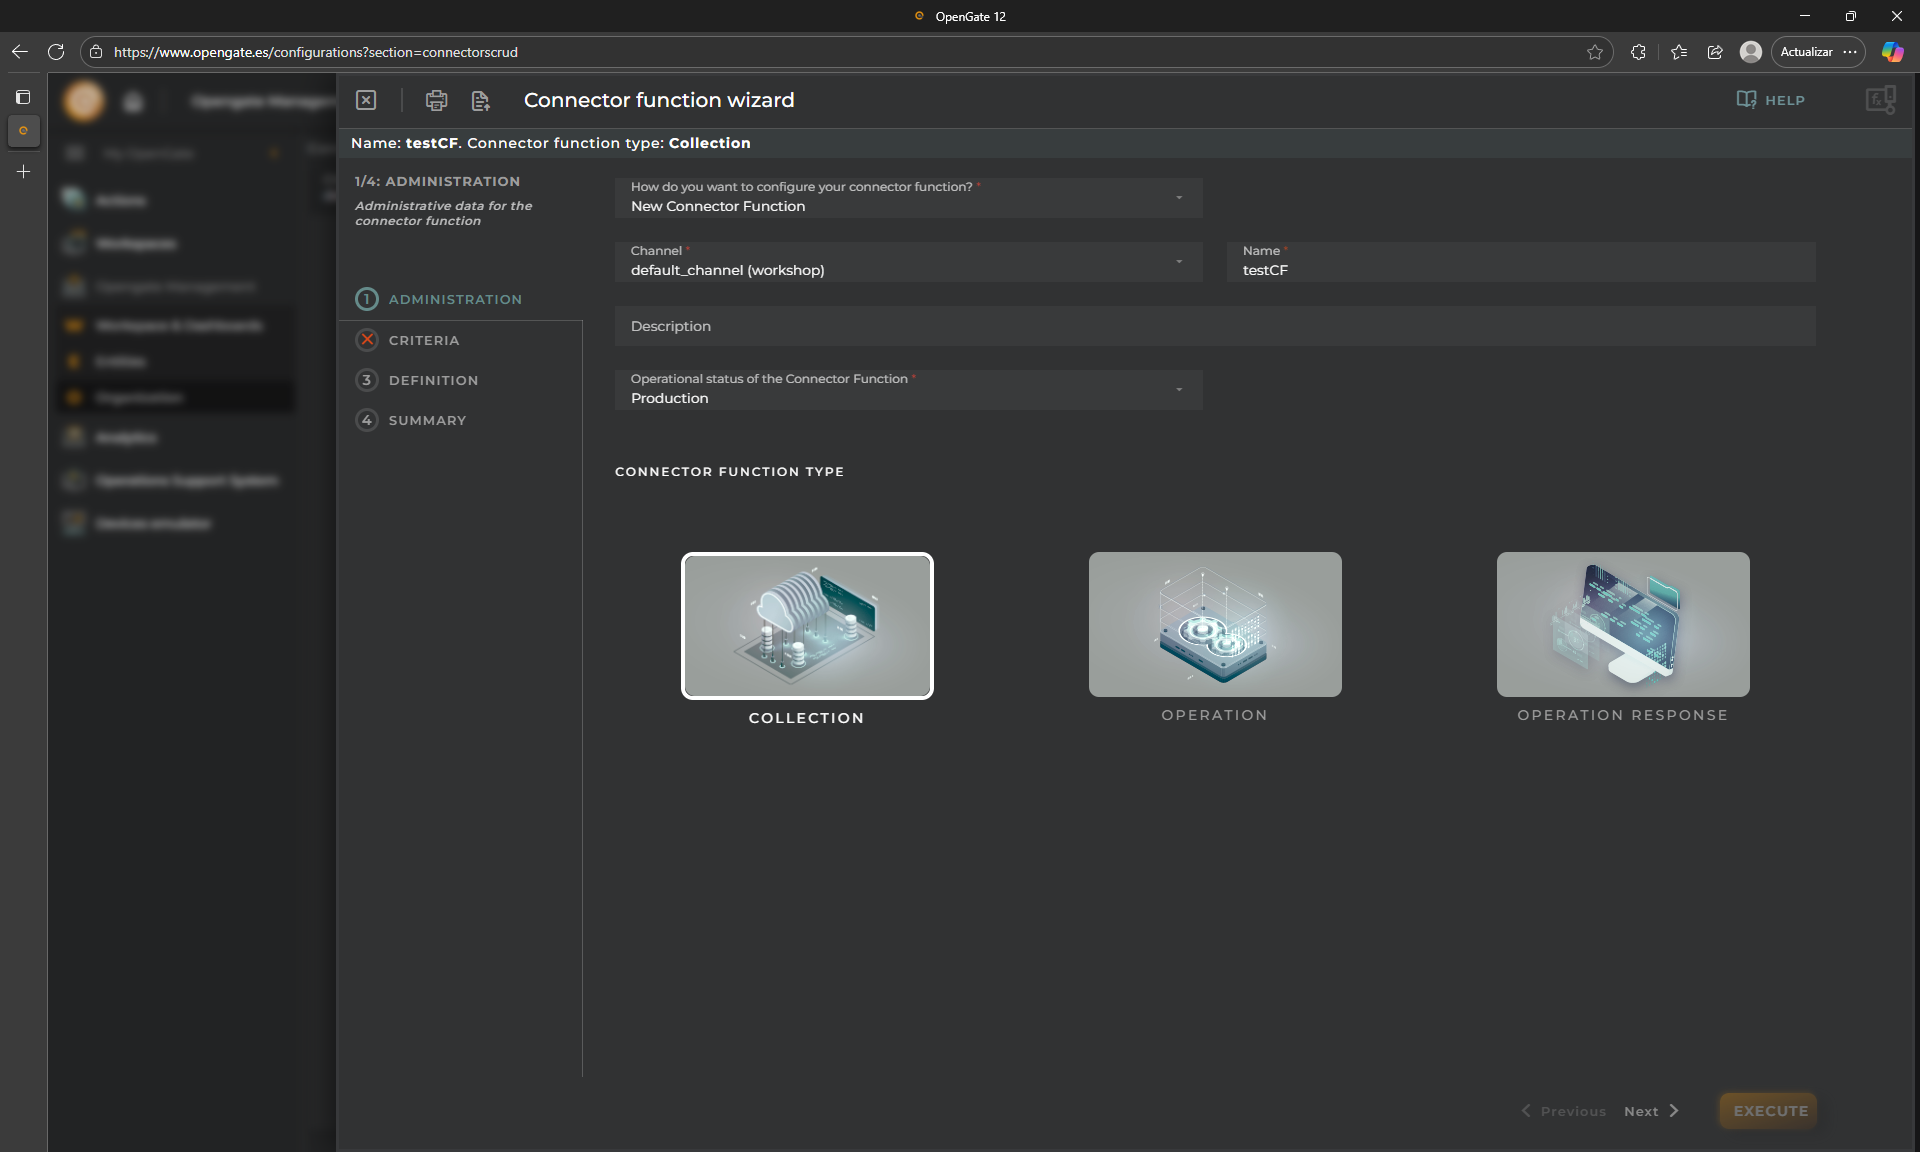
2. Fill Administrativa data Let’s configure our Connector Function administrativa data:
- New Connector function?: In case we have others we could clone another as template, but this is our first one, so click on
New Connector function - Name: for this tutorial, use
testCF - Operational Status: You can choose if you want to enable or disable this CF, choose
Production - Type: We said that is a superpower because not only we can use the Connector Functions to collect data. We can use it to manipulate operations request or responses. For this tutorial, choose
COLLECTION
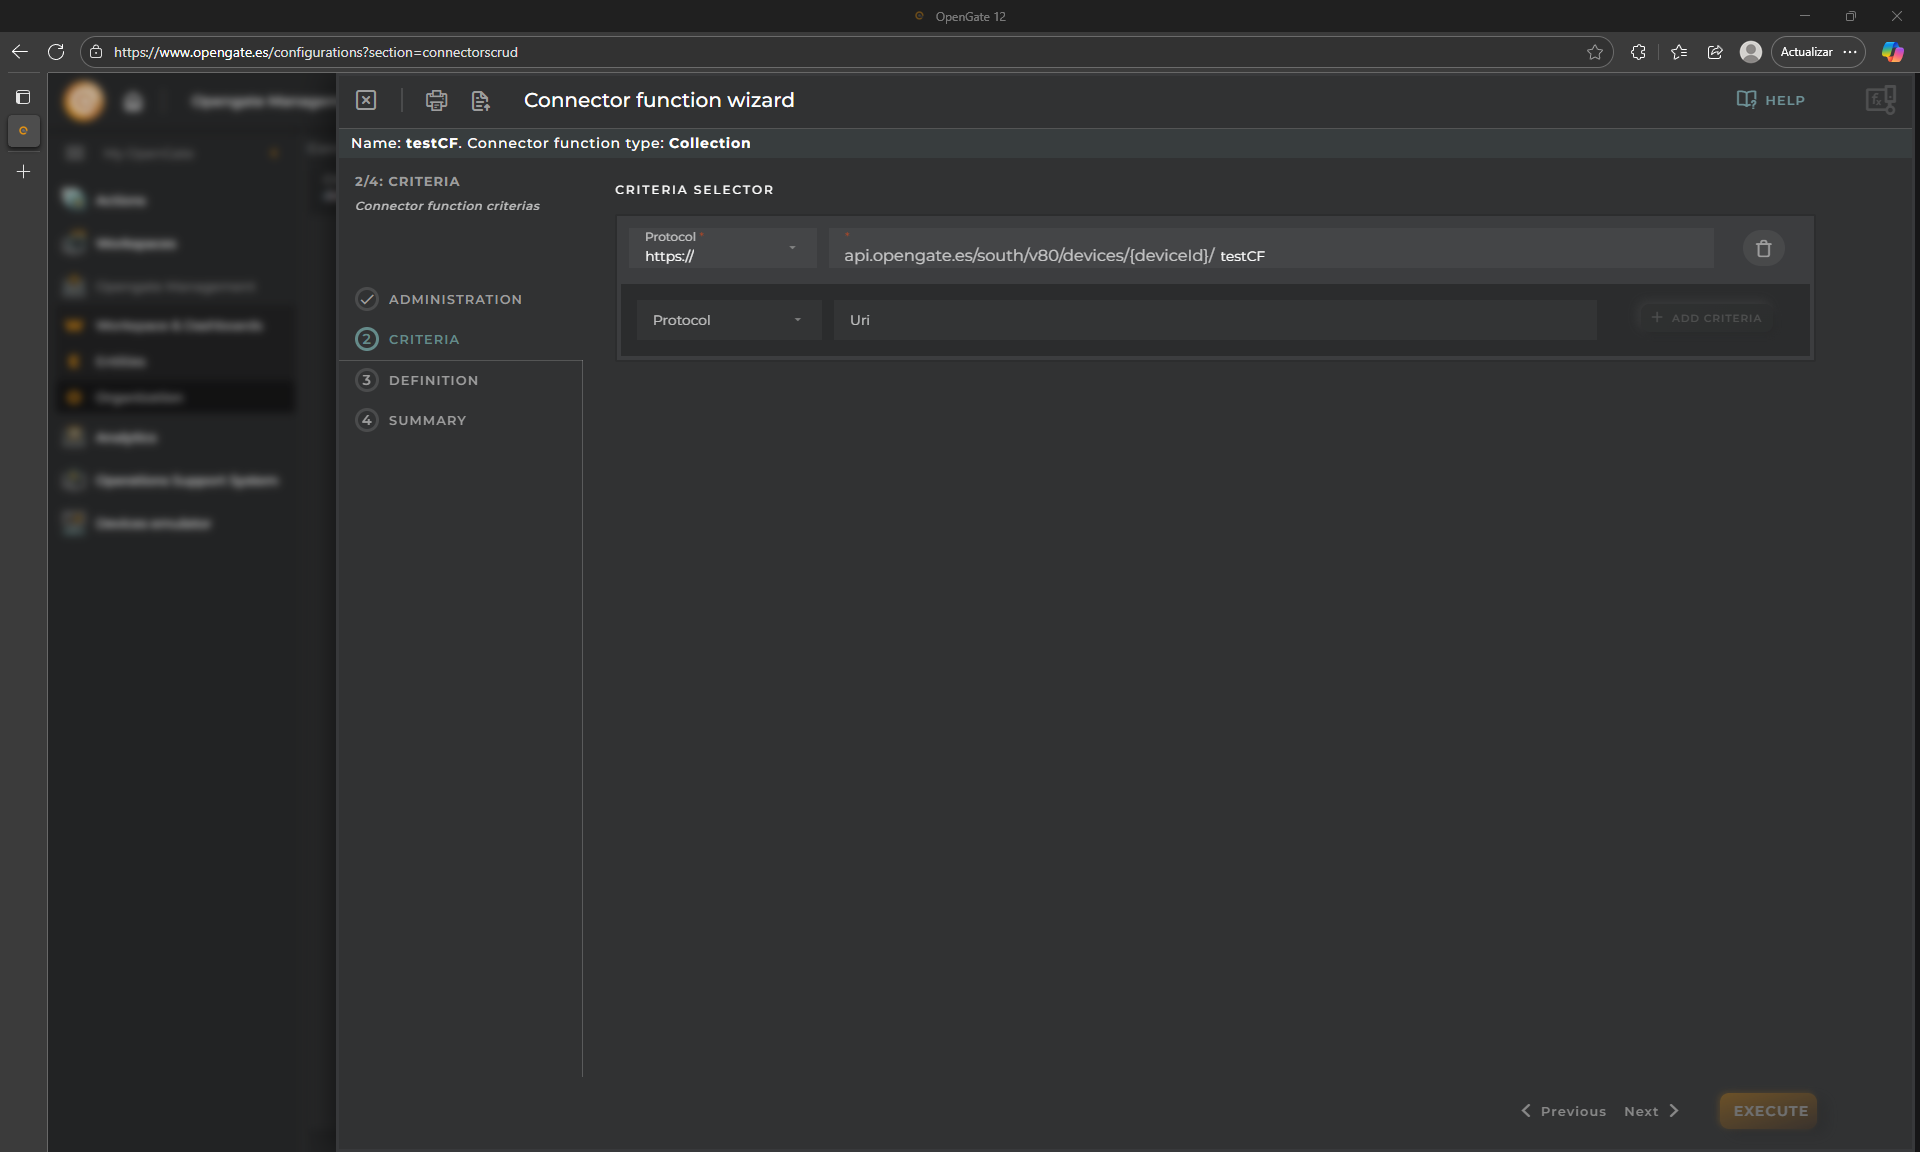
3. Configure criteria
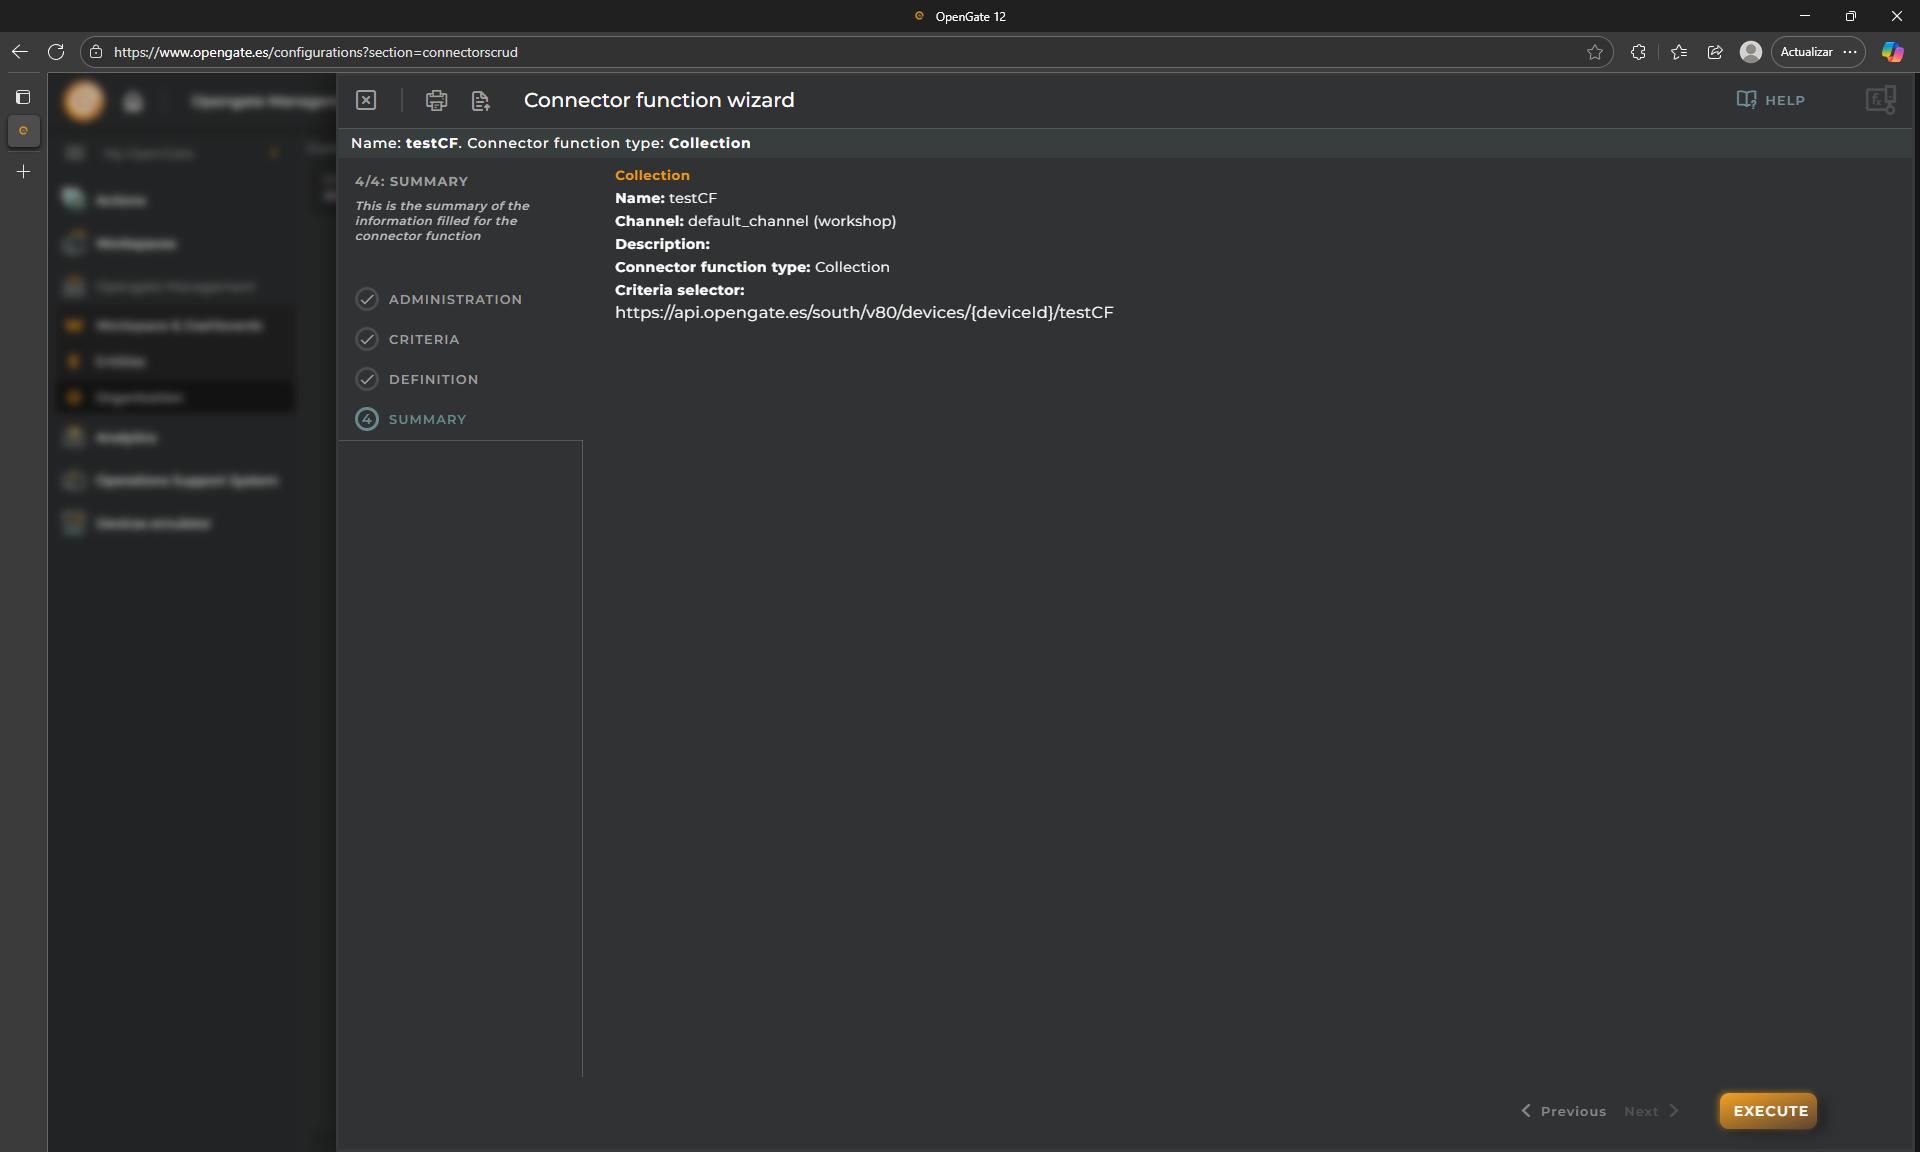
This allows you to decide what of the available protocols will activate this Connector Function and the URI to use as target by the devices collection proccess. For this demo, we will use https:// and for the URI enter: testCF. As you can see, our endpoint will be https://api.opengate.es/south/v80/devices/{deviceId}/testCF where {deviceID} must be replaced by the device identifer.
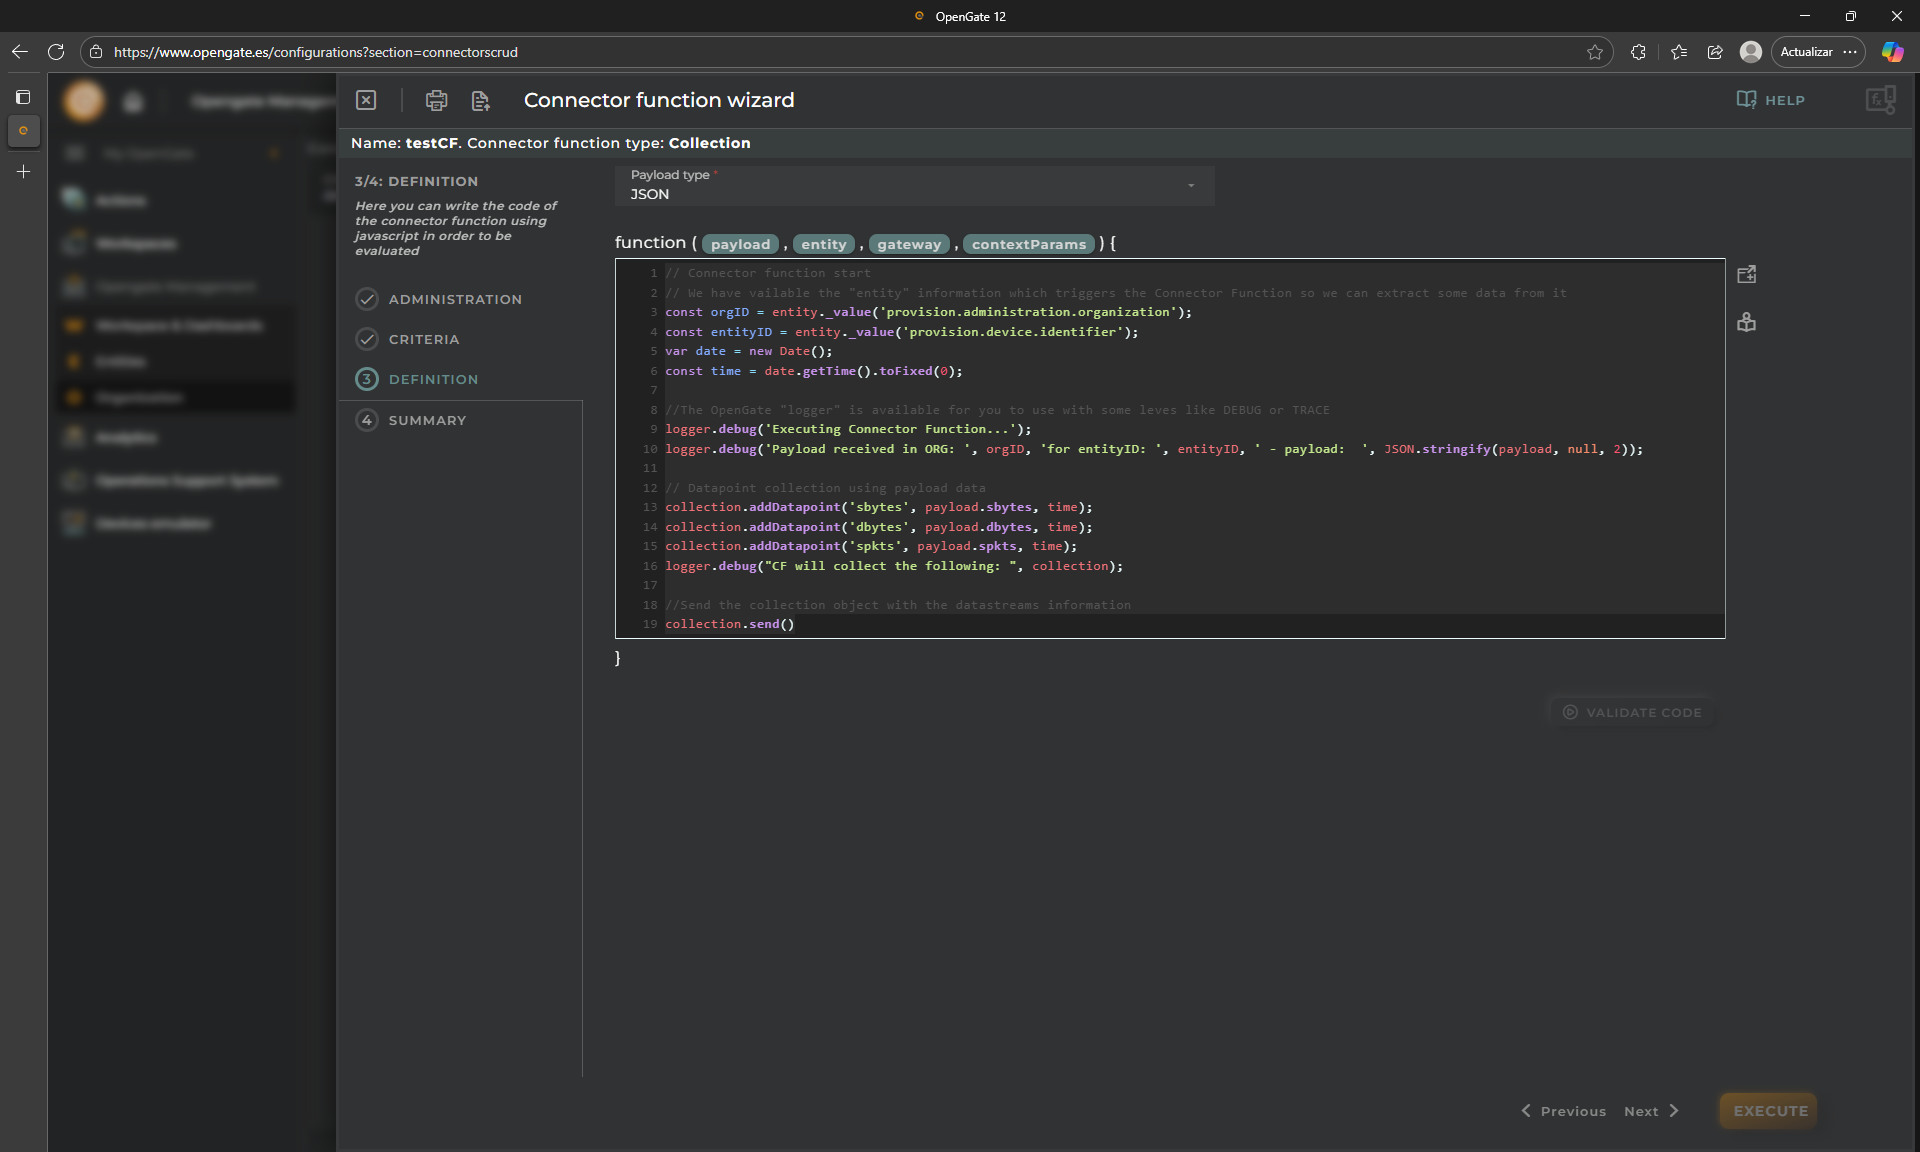
3. Definition, Let’s Coding! All the power of JavaScript and a lot of predefined functions and connectors are available for you to build your connector function. For this tutorial, the idea is to show you the power of this functionality, so let’s code a basic connector function that take the values of the payload (we will see later the payload and collect them to the device datastreams).
Check the code bellow, read the code comments to better understanding:
// Connector function start
// We have vailable the "entity" information which triggers the Connector Function so we can extract some data from it
const orgID = entity._value('provision.administration.organization');
const entityID = entity._value('provision.device.identifier');
var date = new Date();
const time = date.getTime().toFixed(0);

//The OpenGate "logger" is available for you to use with some leves like DEBUG or TRACE
logger.debug('Executing Connector Function...');
logger.debug('Payload received in ORG: ', orgID, 'for entityID: ', entityID, ' - payload:  ', JSON.stringify(payload, null, 2));

// Datapoint collection using payload data
collection.addDatapoint('temperature', payload.temp, time);
collection.addDatapoint('humidity', payload.hum, time);
collection.addDatapoint('presence', payload.pres, time);
logger.debug("CF will collect the following: ", collection);

//Send the collection object with the datastreams information
collection.send()
Use this code, copy and paste into the code box and click on “VALIDATE CODE”
⚠️ IMPORTANT: Choose JSON as Payload type in the top aprt of the screen and click on validate code. Then, go to the next step.
3. Review the summary and EXECUTE! You can check what we will do with this connector function from the summary. Click on “EXECUTE” to save it.
🐞 Step 2: Prepare for Debugging
Now that we have created our Connector Function, we want to ensure that it works so, for that OpenGate offers the possibility to debug it directly on the platform. We need a copuple of things…
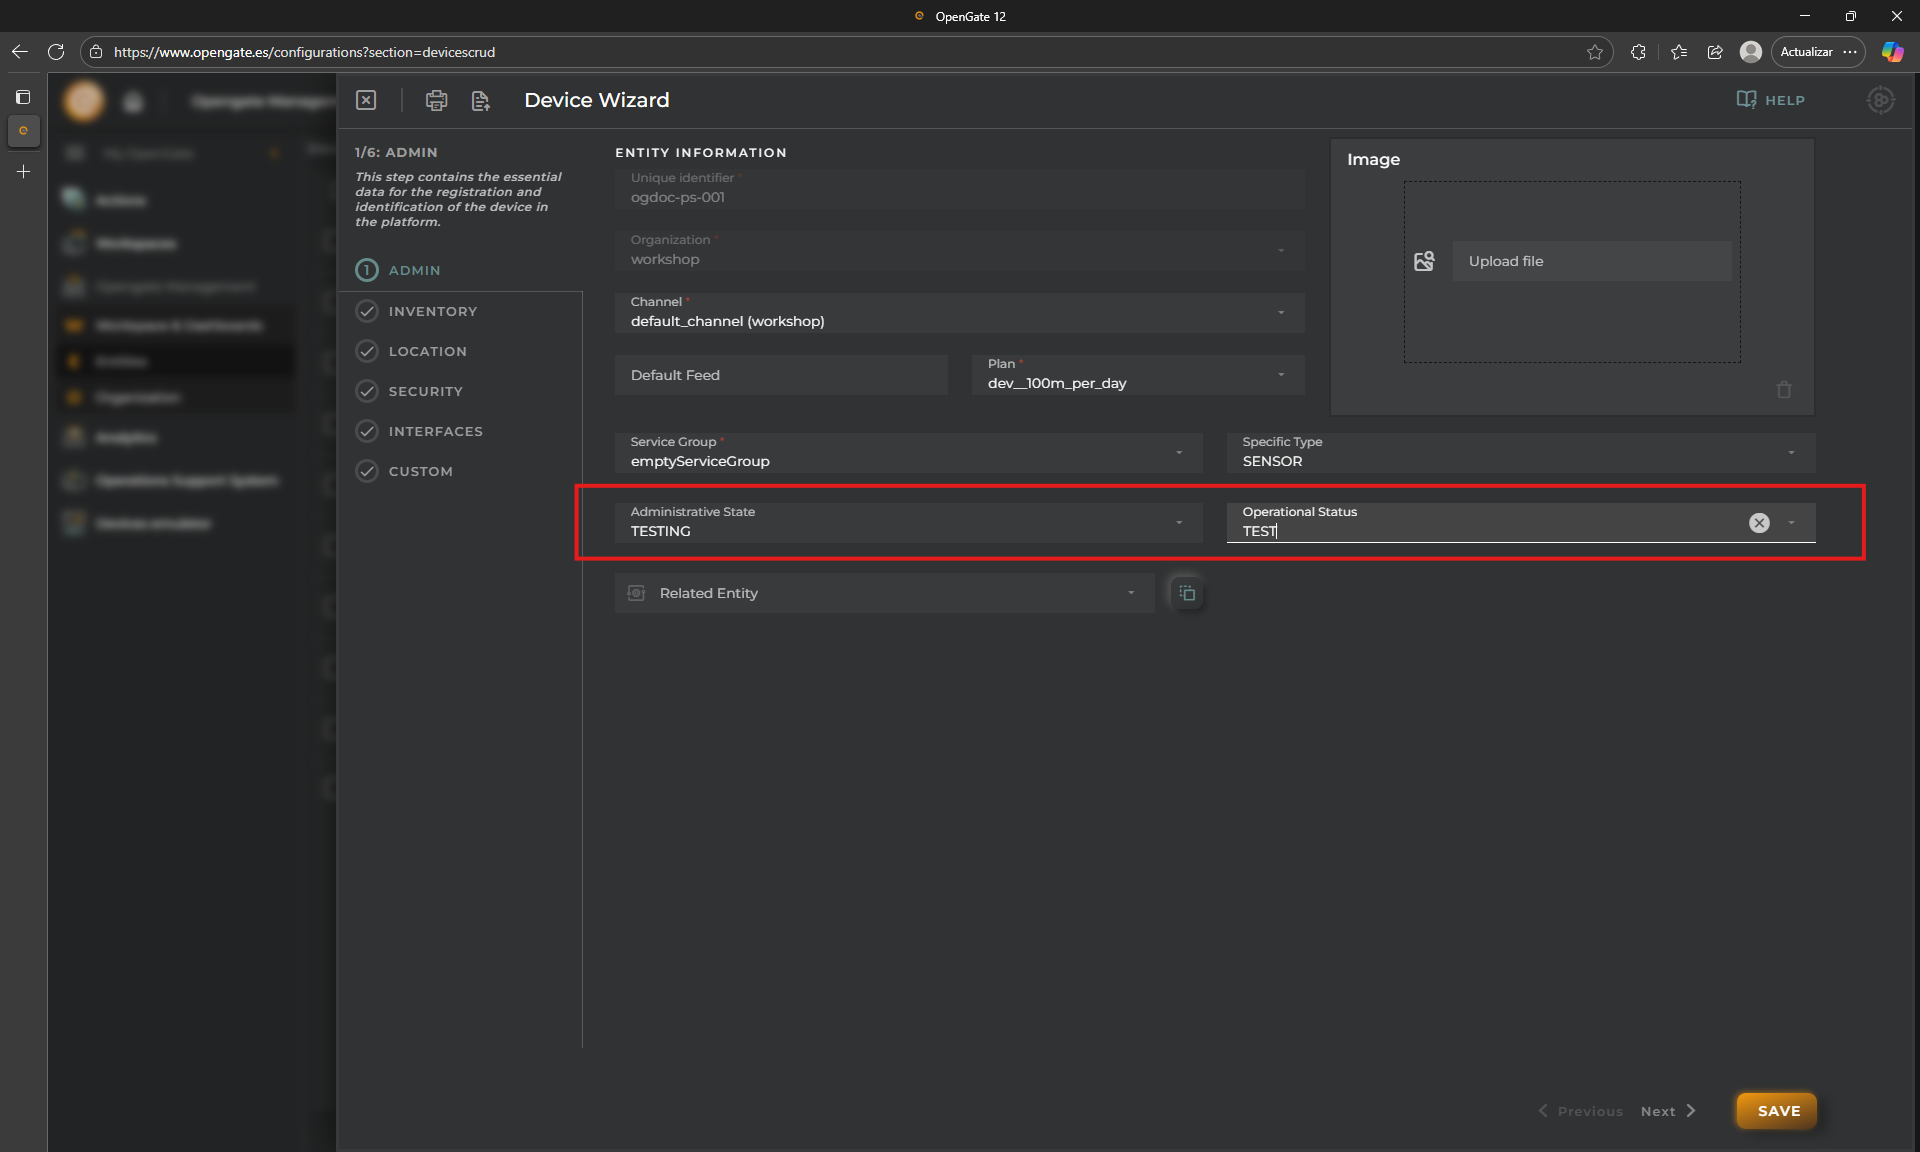
1. Use a Test Device
Remember our first device: [YourPrefix]-ps-001?
We’ll use it to test the connector function.
- Go to OpenGate Management > Devices
- Click EDIT from the entity menu
- In the wizard:
- Set Administrative Status to
TESTING - Set Operational Status to
TESTING - Click EXECUTE
- Set Administrative Status to
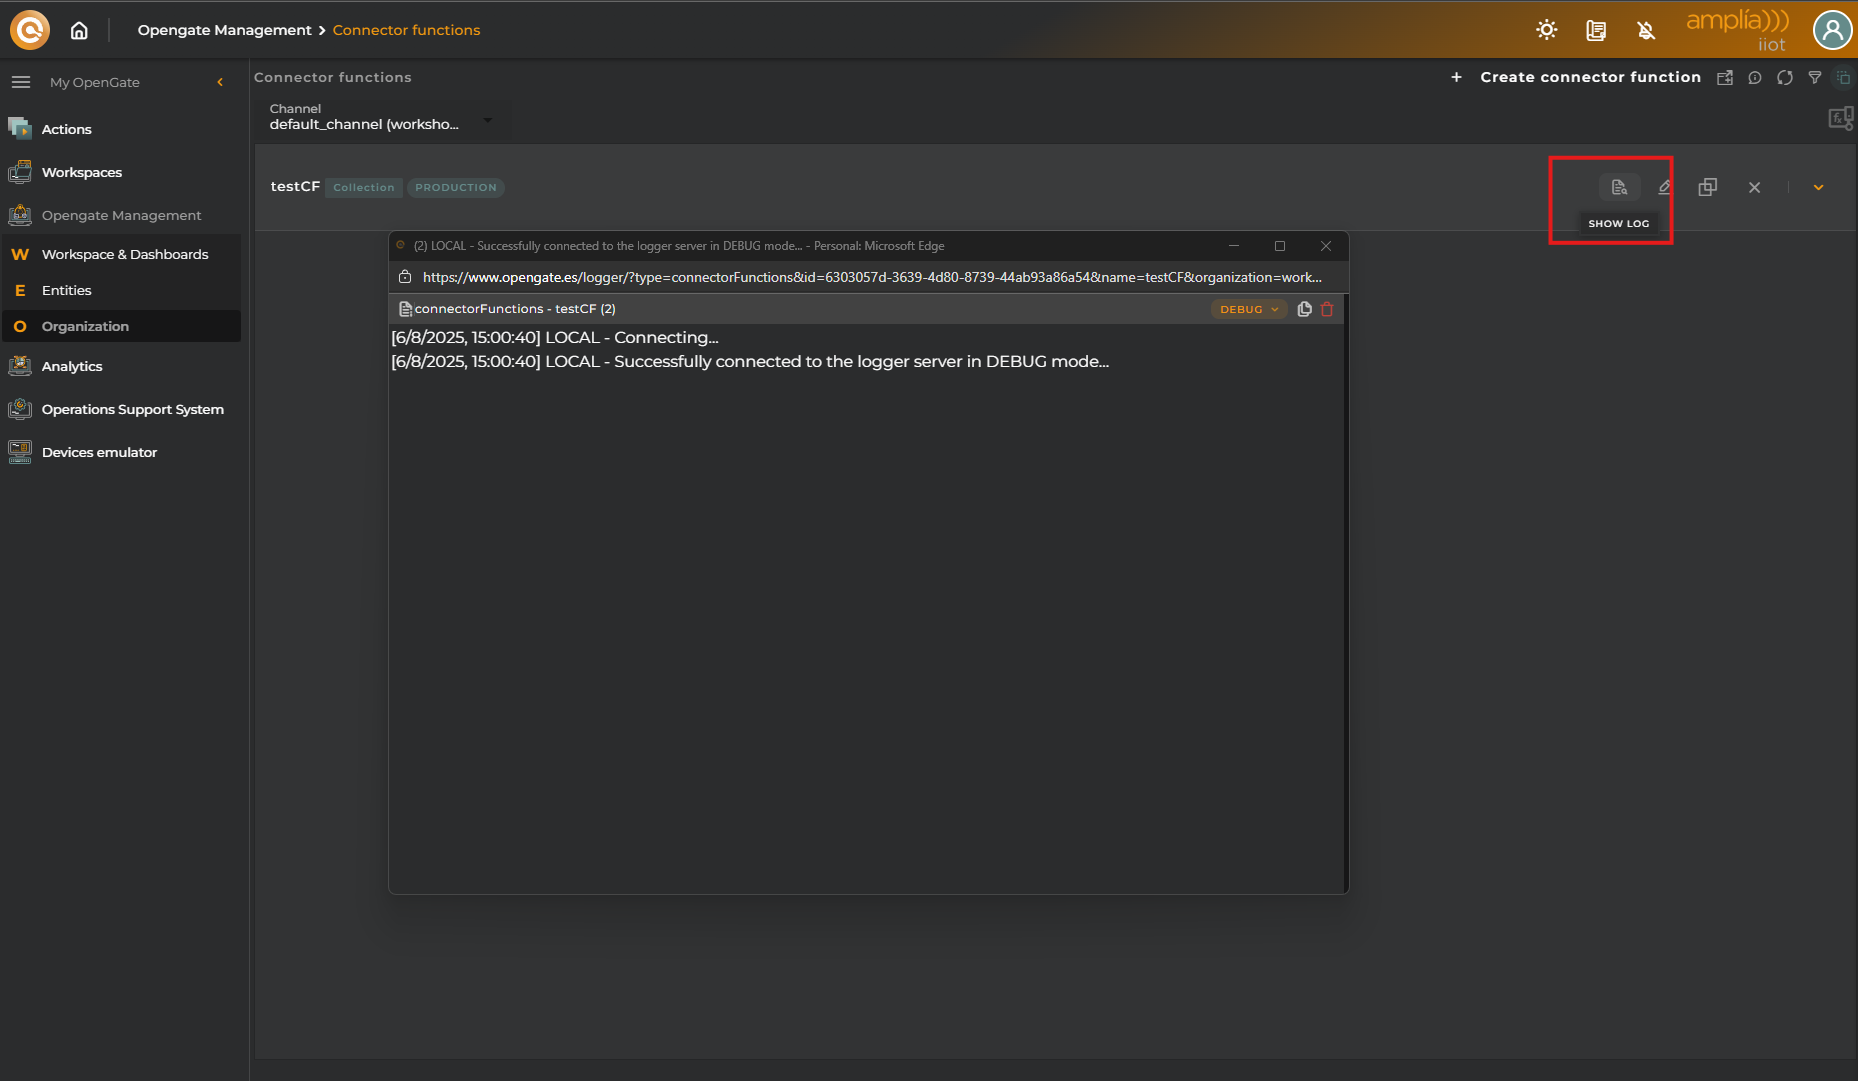
2. Open Connector Function Logs
Go to OpenGate Management > Connector Functions
Click on OPEN LOG for your connector function (e.g. cfName)
In the log viewer, set the log level to DEBUG to see detailed execution traces that we configured previously.
🔌 Testing with the OpenGate REST API
OpenGate’s REST API provides full access to platform functionality, including data collection. The endpoint used by the Device Emulator is the same one your physical devices will use via the HTTP connector.
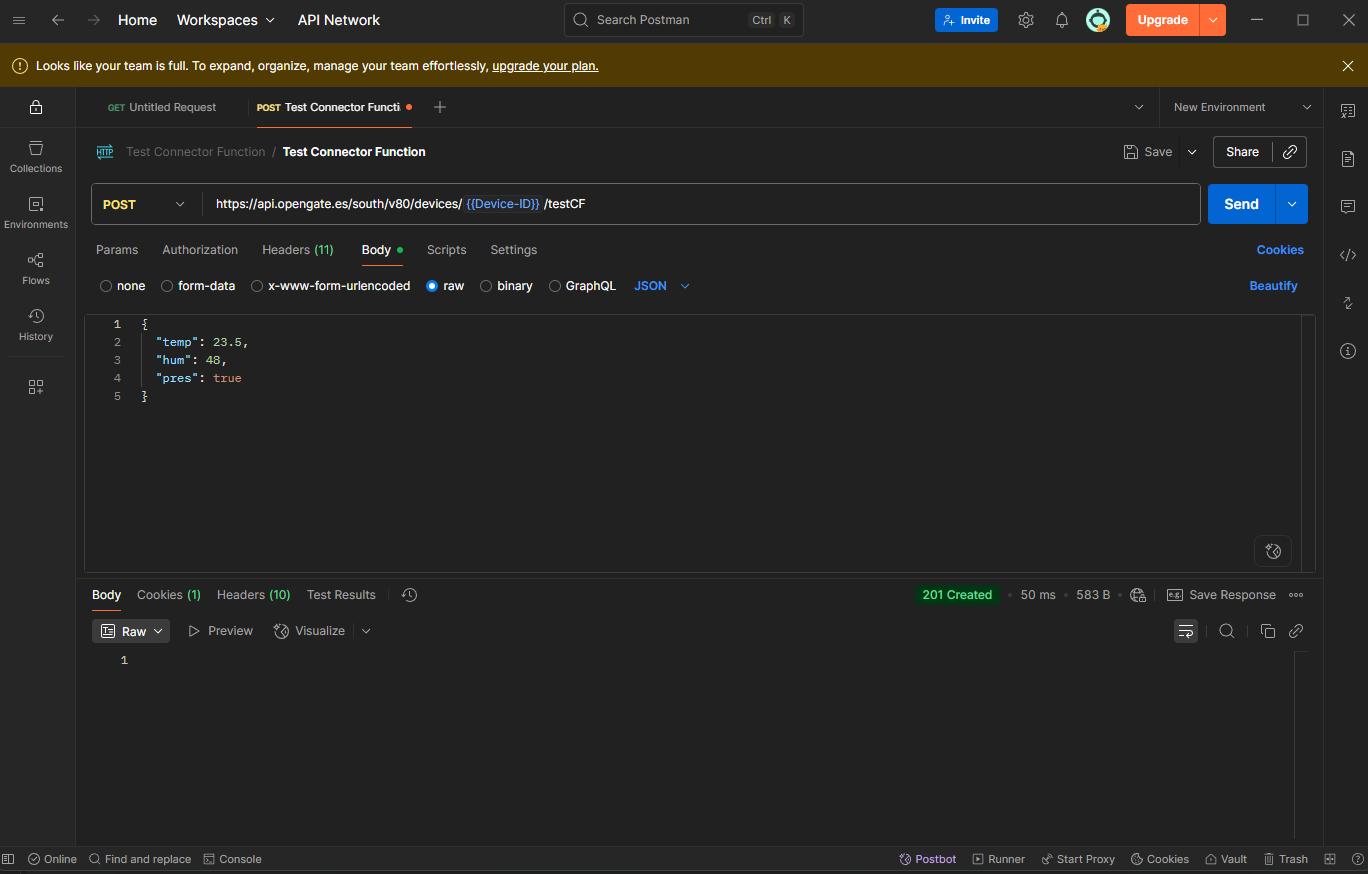
1. Prepare Your JSON Payload
For this tutorial, use the following example payload:
{
  "temp": 23.5,
  "hum": 48,
  "pres": true
}
2. Retrieve Your API Key
Each OpenGate user has a unique API key for authentication.
- Go to the OpenGate Web Console
- Click on your user icon (top right)
- Copy your API key from the dropdown
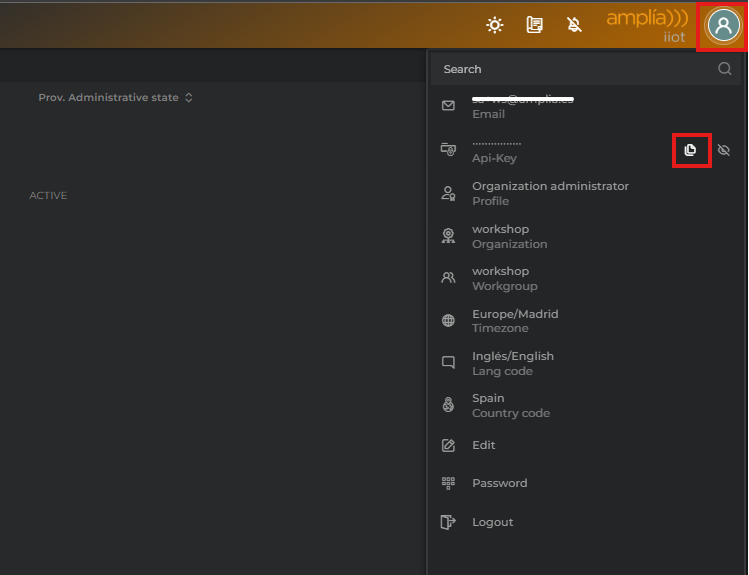
⚠️ Important: Keep your API key secure and never share it.
3. Send the Request
Send a POST request to the collection endpoint replacing {{Device-ID}}} with [YourPrefix]-ps-001:
https://api.opengate.es/south/v80/devices/{{Device-ID}}}/testCFUse a tool like Postman and include your API key in the headers:
Authorization: X-ApiKey [YourAPIKey]
Content-Type: application/json
If the response status is 201 Created, your data was successfully received.
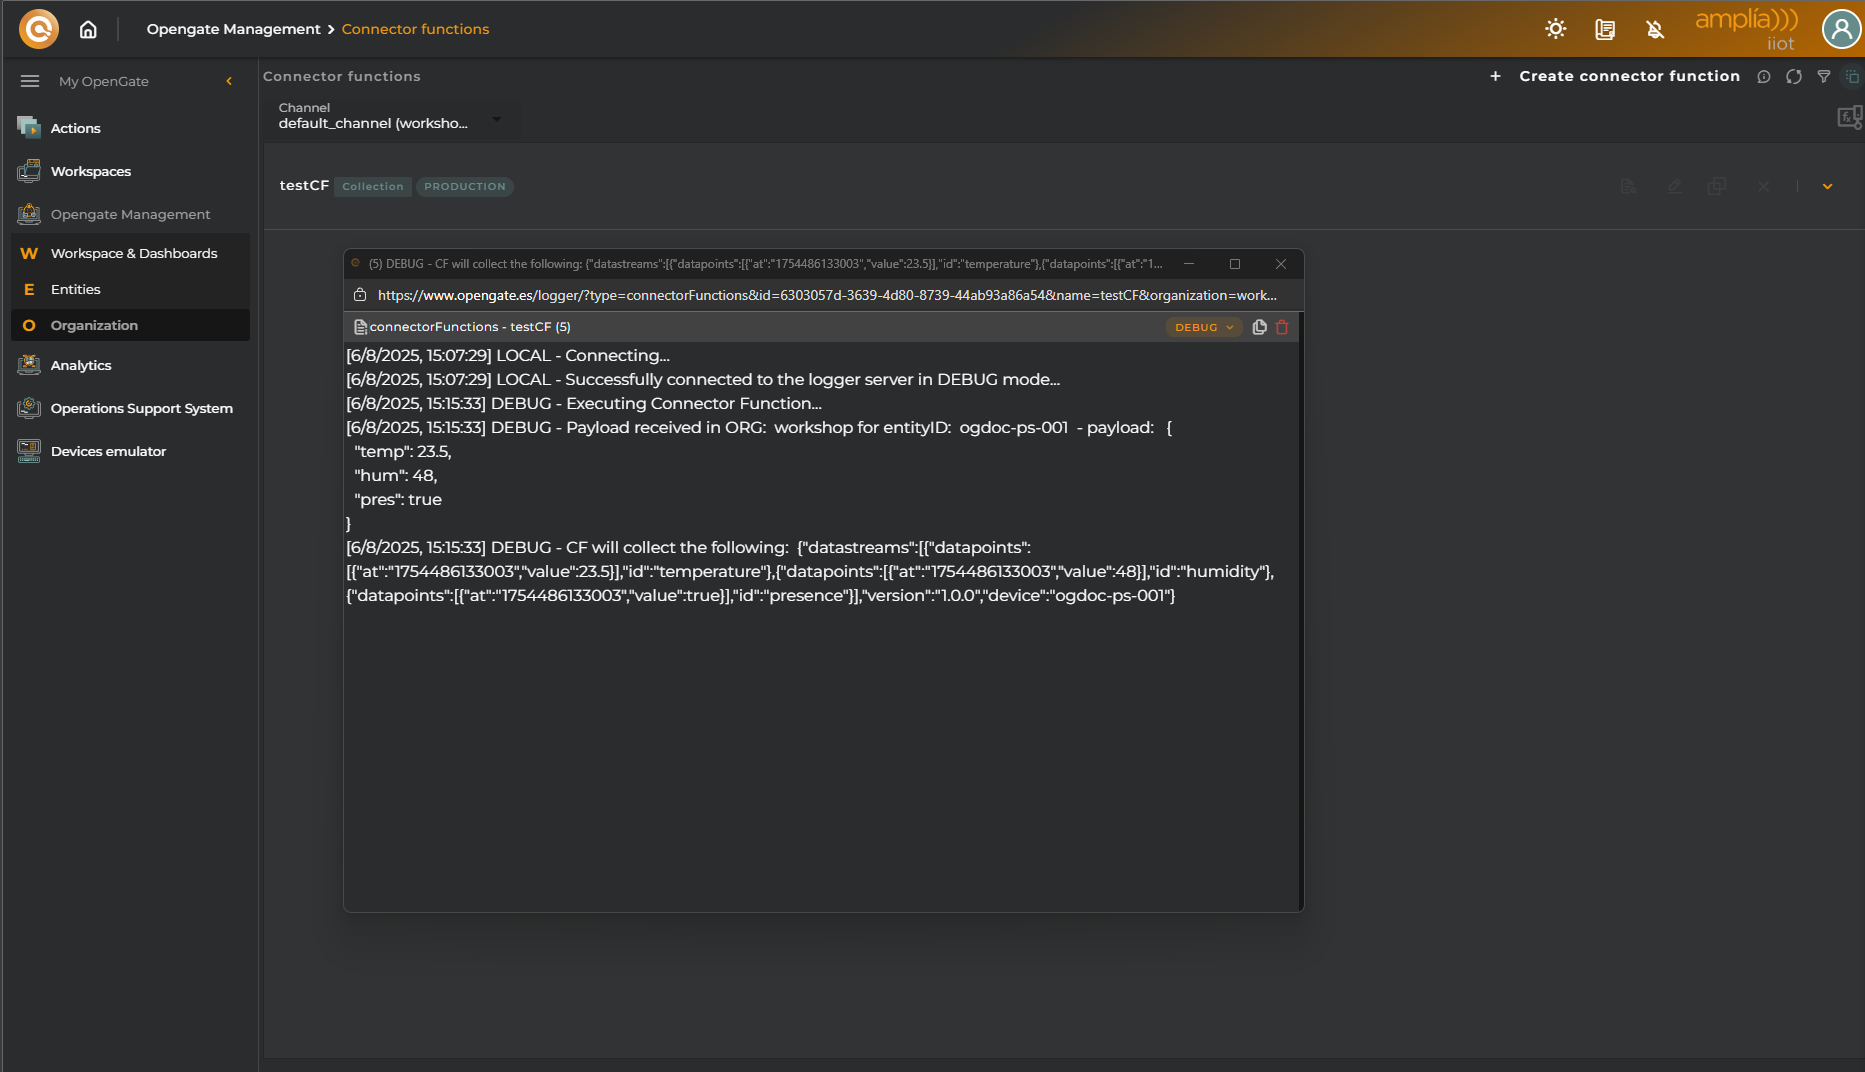
📋 Check Connector Function Logs
Return to the Connector Function log viewer and inspect the execution trace.
If the function ran successfully, you’ll see the transformed payload and confirmation of data collection.
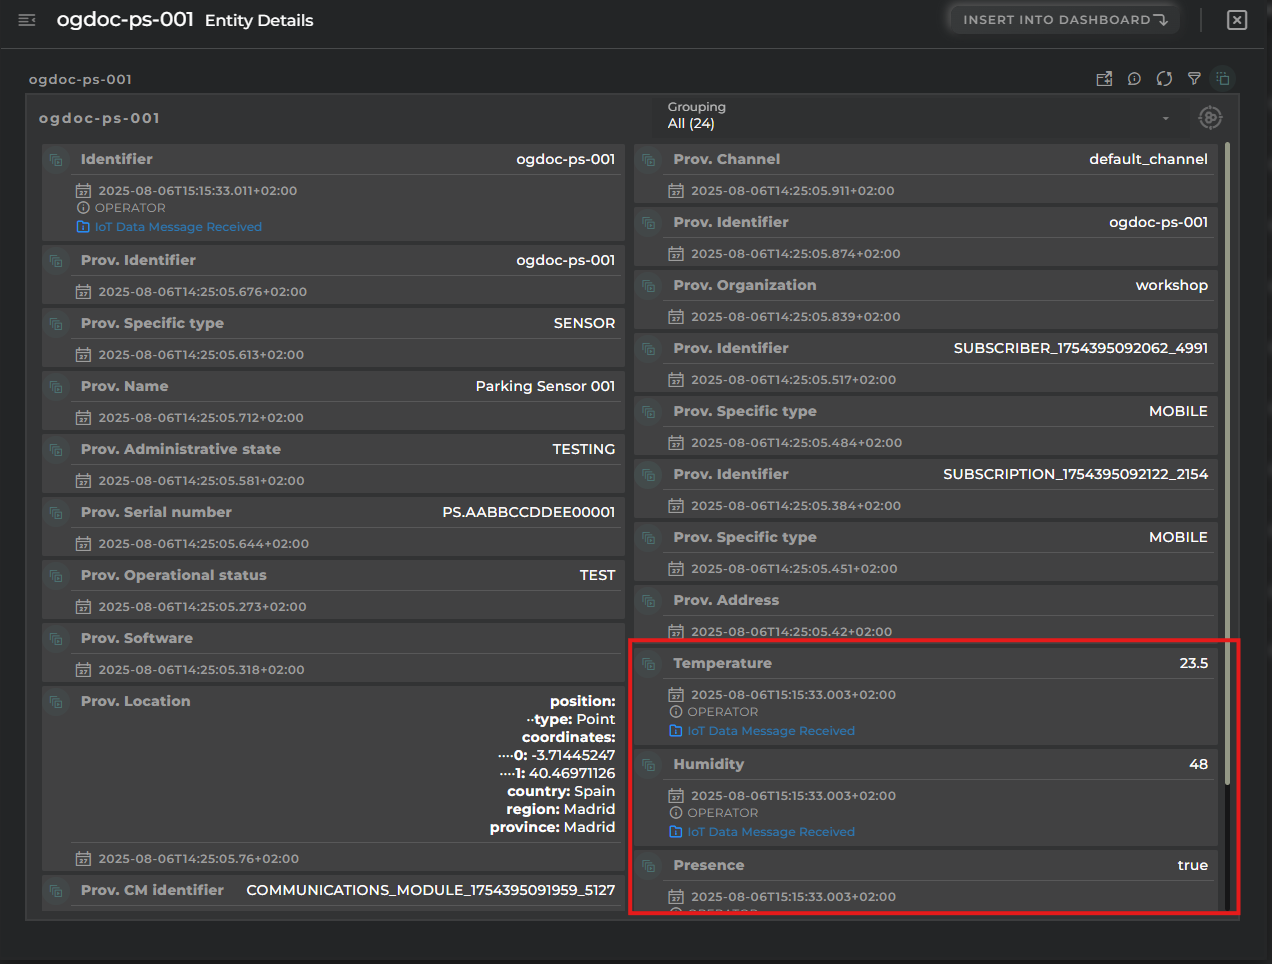
📊 Validate in Entity Details
Finally, go to OpenGate Management > Devices
Open the Entity Details Panel for the device "[YourPrefix]-ps-001"
You should see the collected values displayed in the corresponding datastreams.
¡Buena idea, Daniel! Aquí tienes una sección final que resalta el poder de las Connector Functions y cómo pueden transformar la experiencia de los usuarios en OpenGate. Está escrita en tono inspirador, técnico y alineado con el estilo de tu documentación:
🚀 Why Connector Functions Matter
Connector Functions are more than just a technical feature — they’re a gateway to flexibility, interoperability, and control.
In real-world IoT deployments, data rarely arrives in a perfect format or the firmware devices cannot be manipulated. Devices from different vendors, legacy systems, or custom firmware often send payloads that don’t match the expected schema. Without Connector Functions, this would mean costly integrations, manual preprocessing, or limited compatibility, as well as generate and deploy new software versions when devices or firmwares change…
With OpenGate’s Connector Functions, users can:
- 🧠 Transform incoming data to match their datamodels, regardless of origin for different supported protocols (HTTPs, COAPs, DLMs, etc.).
- 🧩 Enrich telemetry with metadata, calculated fields, or contextual information and fill other datastreams with values calculated in processing time.
- 🔄 Normalize formats across heterogeneous devices and protocols.
- 🛠️ Adapt to change — update logic as devices evolve or business rules shift directly from the OpenGate Web Console.
- 📈 Accelerate onboarding by removing friction between device and platform, or additional services.
Whether you’re integrating industrial PLCs, smart meters, or custom-built sensors, Connector Functions empower you to make OpenGate work for your data — not the other way around.
💡 Pro Tip: Use Connector Functions to build reusable logic across multiple devices or projects. They’re not just a patch — they’re a strategic tool for scalable IoT architecture.